- Support home
- Usages
- Basic usage and user settings
- Organization management
- Buy with requests
- Sell to requests
- Banban Board
- Banban Board Tutorial — Basics
- Banban Board Tutorial — Calculation
- Messages
- Video meeting
- Shared files
- OneShot Demo Video Recorder
- Appearance and branding
- Ban list
- Common
- FAQ
- Limitations and issues
- H-Market model
- Supported browsers
- Contact
- Subscribe to news updates
- Free and options
- Paid options
- Land domain names
- Sellers
- Banban Board
- Paid options
- Promotion materials
- Identity verification
- Legal
- Terms
- Privacy policy
- Logging setting
- SCT
- Content Creation Guidelines
Organization management
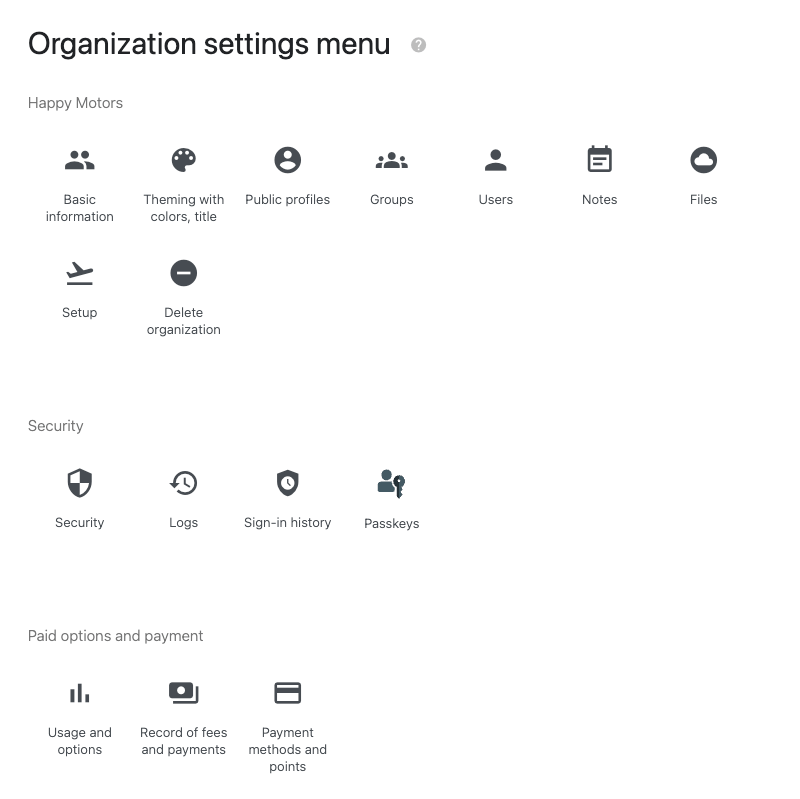 The organization settings menu
-
people_alt Add or invite users to an organization
To add users on RequestLand, you need to invite them via an invitation link, allowing them to enter their personal information such as birthday themselves. Unlike adding users on Windows, you cannot add users directly.
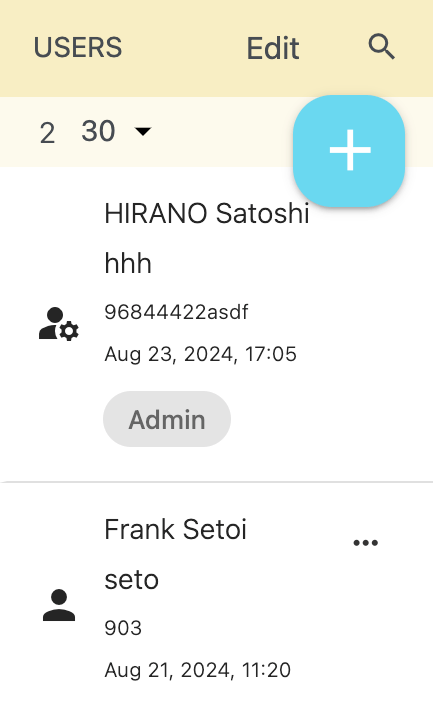 User list
Press "Add users to this organization" in the user menu to open the Users page, and then press the + button.
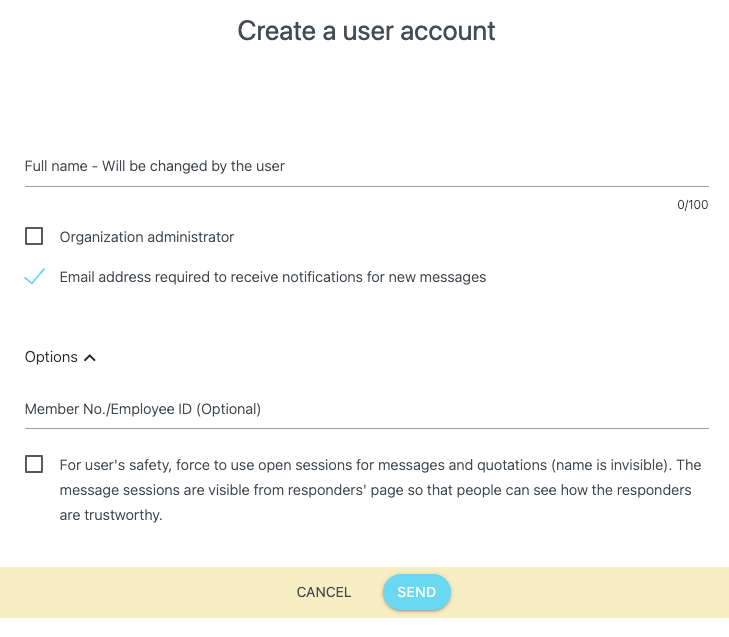 Add user account
Enter the new user's name, whether to make them an administrator, whether email address input is mandatory, and optionally, an employee number, then press the "Send" button.
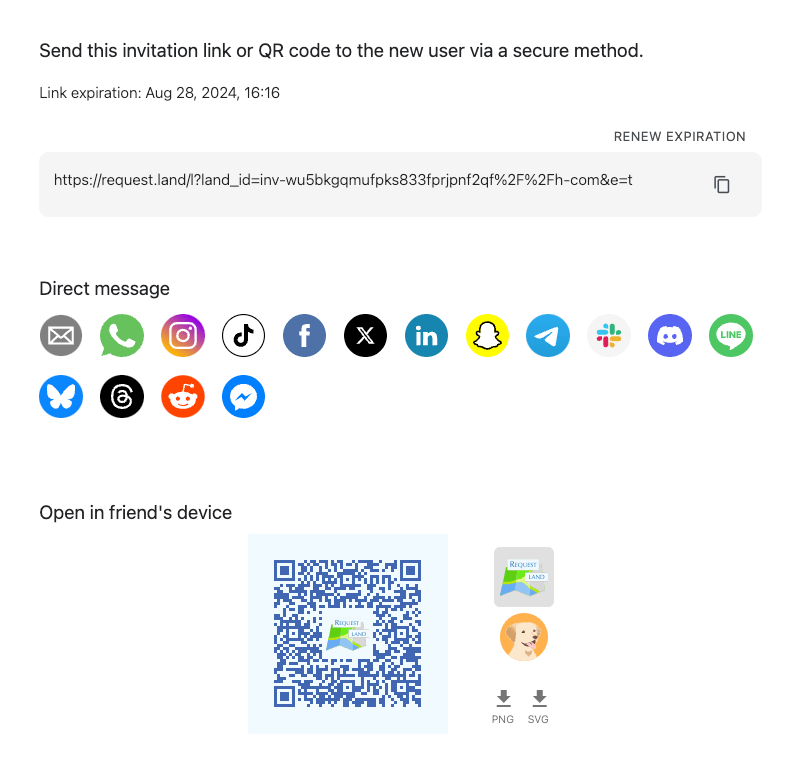 Invitation link page
The invitation link and QR code will be displayed, so send them to the new user using secure methods.
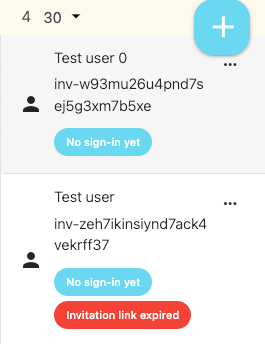 The Users page: Users with "No sign-in yet" and "Expired invitation link"
As shown on the above image, the user list will display users who have been invited but have not completed their first sign-in yet, labeled as "No sign-in yet." The Land Name will be a temporary random string, replaced with the user's Land Name once the user signs in.
When the new user signs in for the first time, they will be prompted to enter their name, birthday, country, and Land Name. If you check "Email address required", passkey registration will follow email confirmation, and they will be signed in. If you don't, they will directly register the passkey and sign in.
For security, an invitation link expires after 24 hours. To check the expiration date, press the user labeled "No sign-in yet" in the user list, and the invitation link page displays it.
When the invitation link expires, it will be labeled as "Invitation link expired." You can press the "Renew expiration" button on the invitation link page to update the link's expiration date. You will need to resent the renewd invitation link.
For users who remain labeled as "No sign-in yet," press the edit button on the list to select them, then press the delete delete button to remove them.
Tips for Sending Invitation Links
Make sure to share the invitation link with new users in a secure way, so it doesn’t end up with someone it shouldn’t. If someone else gets hold of the invitation link, they could register as a user in your organization without anyone noticing. The safest method is to hand over a QR code in person.
The name initially entered by the administrator will not be visible to the person who opens the invitation link. If the name entered by the person who opens the invitation link does not match, it is considered that an unrelated third party may have obtained the invitation link and registered as a user. Please delete that user. To prevent such situations, it is safer to initially turn off "Orgnization administrator" at the invitation and then confirm and make them an administrator later.
Since RequestLand is a marketplace, using pseudonyms or nicknames could be perceived as fraudulent by buyers or sellers, potentially leading to legal issues. Although new users can change their name, please enter the official full name here to prompt users to use their official full name as on their ID. Always verify and correct the name after the user signs in if necessary using administrative privileges.
It's a good idea to set a rule for Land Names that encourages using something based on full names, like "hirano-satoshi" instead of a nickname like "lucky." This can help build trust with buyers and sellers and reduce potential issues. When you send the invitation link, be sure to clearly explain the guidelines for creating a Land Name.
The user’s birthday will be used later for identity verification when creating new passkeys. Make sure to encourage users to enter their correct birthdate. Note that birthdays will be used for verification not during this invitation process but when creating passkeys in the future.
If you don’t check "Email address required", users won’t be able to receive notifications like new messages or changes to their user information. Also, they won’t be able to verify their identity by email when creating passkeys later. Unless there’s a specific reason to make registration extremely easy, it’s better to require an email address.
Administrators have access to read and modify all data within the organization, so make sure only a trusted few have this role. However, it’s important to have at least two, preferably three or more, administrators to cover situations like unexpected departures or illnesses. If you're using a paid option, you'll need multiple administrators who can manage the credit card payments. If there are no administrators and payments lapse, your data could eventually be deleted.
Peace and Passion cannot provide support for managing users within your organization, such as promoting a regular user to an administrator or adding an administrator. Only the members of your organization can confirm the identity of administrators and users.
-
people_alt Delete or manage users
User list
Opening the "Users" option in the organization settings menu will display a list of users. Each row shows the user's name, Land Name, last sign-in date, and whether they are an administrator. Status such as "No sign-in yet" and "Expired invitation link" will also be displayed.
To delete a user, press the Edit button on the list, select the user, and then press the delete delete button to remove them.
Deleted users cannot be restored. Please proceed with caution. When a member leaves the organization, consider setting their status to "Sign-in disabled" instead of deleting the user.
Even if a user is deleted, the data they created will remain. The LandID and Land Name associated with the data will also remain. As for the user's name, it will either remain with the data or be labeled as "Deleted user." Delete the data if necessary.
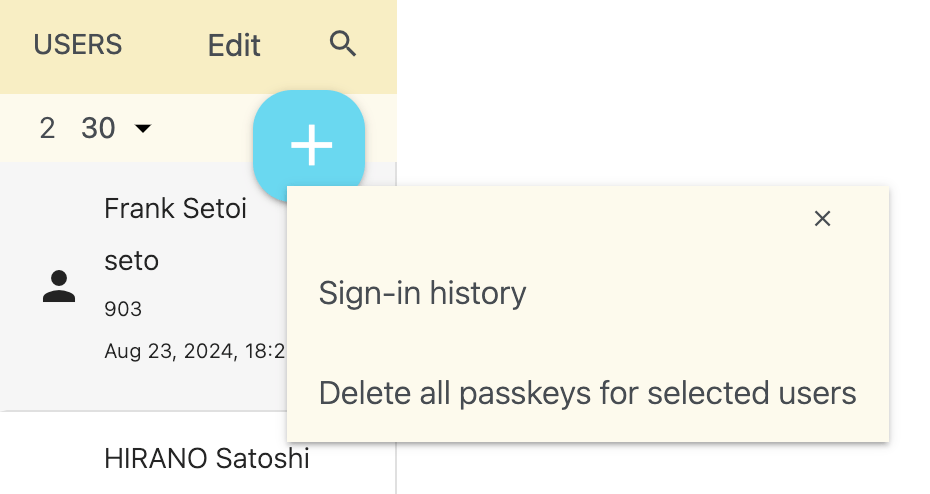 User list menu
To view a user's sign-in history, press the more_horiz button on the user and select "Sign-in history." To view the sign-in history for all users, open "Sign-in history" in the organization settings menu.
If an administrator discovers suspicious sign-in history for a user, deleting the passkey is effective. When an administrator deletes a user's passkeys, the user will no longer be able to access their data from any device and will need to sign out. To delete a user's passkeys, press the more_horiz button on the user and select "Delete all passkeys for selected users." You will need to help the user to sign out and create new passkeys.
To delete passkeys for multiple users, press the Edit button on the list, select the users, then press the more_horiz button on the list header and select "Delete all passkeys for selected users." To delete passkeys from the list of all users' passkeys, open "Passkeys" in the organization settings menu.
To edit a user's basic information, open the user and press the Edit button.
To temporarily disable a user's sign-in, open the user, press the Edit button, and turn on "Sign-in disabled."
To temporarily disable a user's write permissions, open the user, press the edit button, and turn on "Read-only and prohibit writing."
The user's basic information includes fields for member/employee ID and User 1, 2, and 3, which can be used freely within the organization. Non-administrator users cannot make changes, and User 3 is not displayed.
(Planned) The group page will allow for group management. Initially, there will only be a "Head office" group representing the headquarters. We plan to add features for managing branches and groups, as well as access control management.
-
safety_check View user's sign-in history, delete passkeys
To check the sign-in history of a user, open the sign-in history from the organization settings menu or select sign-in history from the user's expanded menu in the user list.
If an administrator discovers suspicious sign-in history for a user, deleting the passkey is effective. When an administrator deletes a user's passkeys, the user will no longer be able to access their data from any device and will need to sign out.
To delete a passkey, select "Delete all passkeys for selected users" from the passkey page or the more_horiz expanded menu in the user list.
To delete multiple users' passkeys at once, select multiple users in edit mode and press delete passkeys from the more_horiz expanded menu next to the delete delete button.
Users whose passkeys have been deleted need to create a passkey before signing in again. For users who have not registered an email address, the administrator should set the email address from the user's information page in advance. At that time, the email verification code needs to be entered. Have the user provide you with the email verification code sent to them.
If a user's email password has been compromised and there is a possibility that the email has been read by a malicious third party, it is safer to change the user's email address to a secure one before deleting the passkey. When an administrator changes a user's email address, the change is notified to both the user's new and old email addresses. Alternatively, have the user reset their email account password.
-
history Operation logs and audit
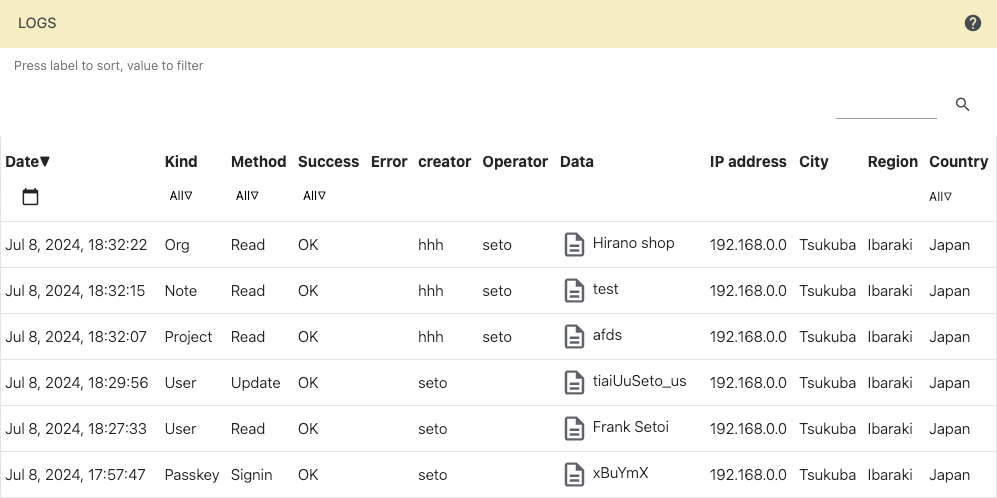 Operation Logs
To view the operation logs, press the history operation logs button from the user settings menu. The table is wide, so please scroll horizontally or turn your device sideways.
Logs are saved for 24 hours. With the Security management option, records can be kept for up to 10 years.
Pressing on a table header will sort the table in ascending or descending order. Pressing on a value will display only the rows containing that value. Pressing multiple values will perform AND searchs. String search places a very high load on the server, so please try to use the table values for searching whenever possible.
The Method column of the table represent the following actions. Note that searches including displaying messages are not recorded. Failed actions are marked as "Failed" in the Success column. If an action is performed by someone other than the user, the operator’s Land name is displayed in the Operator column.
Create Data Creation Update Data update Delete Data Deletion Read Data Reference Sign In Sign In Sign Out Sign Out (does not include expiration of sign-in session) Switch In Switch user account into this organization Lockout Temporary refusal to create passkeys due to identity mismatch Merge Adding a user account to the account list The country or region is a rough estimate based on the IP address and is especially inaccurate when accessed from mobile phones.
Pressing the description button will display the log details and the data contents. For read logs, the data that the user should have seen will be displayed. This data itself is not saved in the reference logs; instead, the last saved data before the reference will be searched and displayed. If the log has been deleted and cannot be found, "The referenced data is out of log range" will be displayed.
If data is deleted, rather than saving the deleted data itself in the log, the data from the last create/update log is saved in the deletion log. Therefore, if the last update log is outside of the retention period at the time of deletion, the deleted data will not be saved.
-
security Security management option
The Security management option includes extended features such as recording, searching, auditing of operation logs, organization passkey management, security event notifications to administrators, access controls, and project sharing with other organizations (some features are planned).
For companies or organizations, many countries require logs to be stored for about 3 to 7 years by law. By turning on paid options on the "Usage and options" page in the organization settings menu, the Security management option is activated and longer logging begins. You can also disable the Security management option later.
You can choose to store logs for 1 to 10 years based on settings on the "Security" page, with charges based on the volume of logs stored. The default retention period is 5 years.
Excluding reference logs from recording is also possible, but this will prevent the detection of unauthorized accesses.
Shared files cannot be deleted during the log duration. To delete expired shared files, open the Shared Files list in the organization menu, sort by creation time, and then delete eligible files.
Please note that the Security management option is not billed based on fixed monthly fees or per user. Billing is based on the volume of logs stored, which means you pay according to the frequency of using security features and the storage duration, regardless of the number of users.
-
monetization_on Become a seller organization
Before making an entry to a request to sell something for a fee, your organization needs to become a seller organization.
In the Organization settings menu, open the Basic Information page and enable "This organization sells."
Then, open the flight_takeoff Setup page to start the organization identity verification. The verification process takes a few days, so it is recommended to start it in advance.
Open a public profile, write about your sales policis such as cancelation policies and return policies.
-
store Organization's public profiles
On a public profiles page, you can create and manage profiles for branches and languages.
You can write many items but, as some items are obtained from the basic information, cannot change.
If you want to sell, you must fill in a public profile with sales policies such as contact information and return policy as they are mandatory by law in many countries. Until you finish that, you cannot make an entry to a request to sell.
The item "Our location and business area" is also important. If you use "Press the map to set location", your organization will be included in the search results of the "Search for shops and organizations" page. (plan)
The logo image will be displayed to your peer during message sessions and used for the user menu icon.
For an organization that sells, don't use a facial photo so that anyone can earn regardless of race, gender or age. You need to choose a logo that your customer could have good impression to you. For example, an animal photo is not appropriate.
-
add_business Create a new organization
To create another organization, press "Create an organization" from the user menu after signing in. A single user can create up to 5 organizations.
-
delete Delete organization / Withdraw from RequestLand
User menu → Organization settings → Delete organization
You will be signed out not only from the deleted organization but also from any other organizations you are signed in to in the same browser. Please sign in again if needed.
Once you delete an organization, all users and data will become inaccessible, and files and D-domains will be deleted immediately. The remaining data will be deleted after all unpaid usage fees are paid. They can't be undone.
Because messages and quotes you sent were copied to your peer, they can continue to read them.
The paid options for deleted organizations will be canceled. If there are charges for paid options, you will still be billed after leaving. Refunds will not be provided for any remaining balance or points, so please withdraw them before deleting the organization.
To leave RequestLand, please delete all the organizations you own as an administrator. Additionally, ask to delete your user account from all the organizations you participate in.
Please note that in order to efficiently use resources, an organization will be deleted after 4 months of inactivity or non-payment for Land IDs or other paid options, even if data still exists.